In this tutorial you’ll set up GitOps with Argo CD on a local cluster, so that a Git repository becomes the only way your cluster changes.
By the end you’ll have a cluster that deploys itself from Git, undoes any manual change within seconds, rolls back with a single git revert, and cleans up resources you delete from the repo. No kubectl apply from your laptop, and no CI pipeline holding cluster credentials.
If you read the Kubebuilder guide, this will feel familiar. Argo CD is itself a controller running a reconciliation loop. The only difference is where the desired state lives: not in a custom resource, but in Git.
What we’re building
Here’s the setup at the end of this post:
- A Git repository holding plain Kubernetes manifests for a small app called
hello. - Argo CD running inside a kind cluster, watching that repository.
- An Argo CD
Applicationthat tells Argo CD which path in the repo maps to which namespace in the cluster.
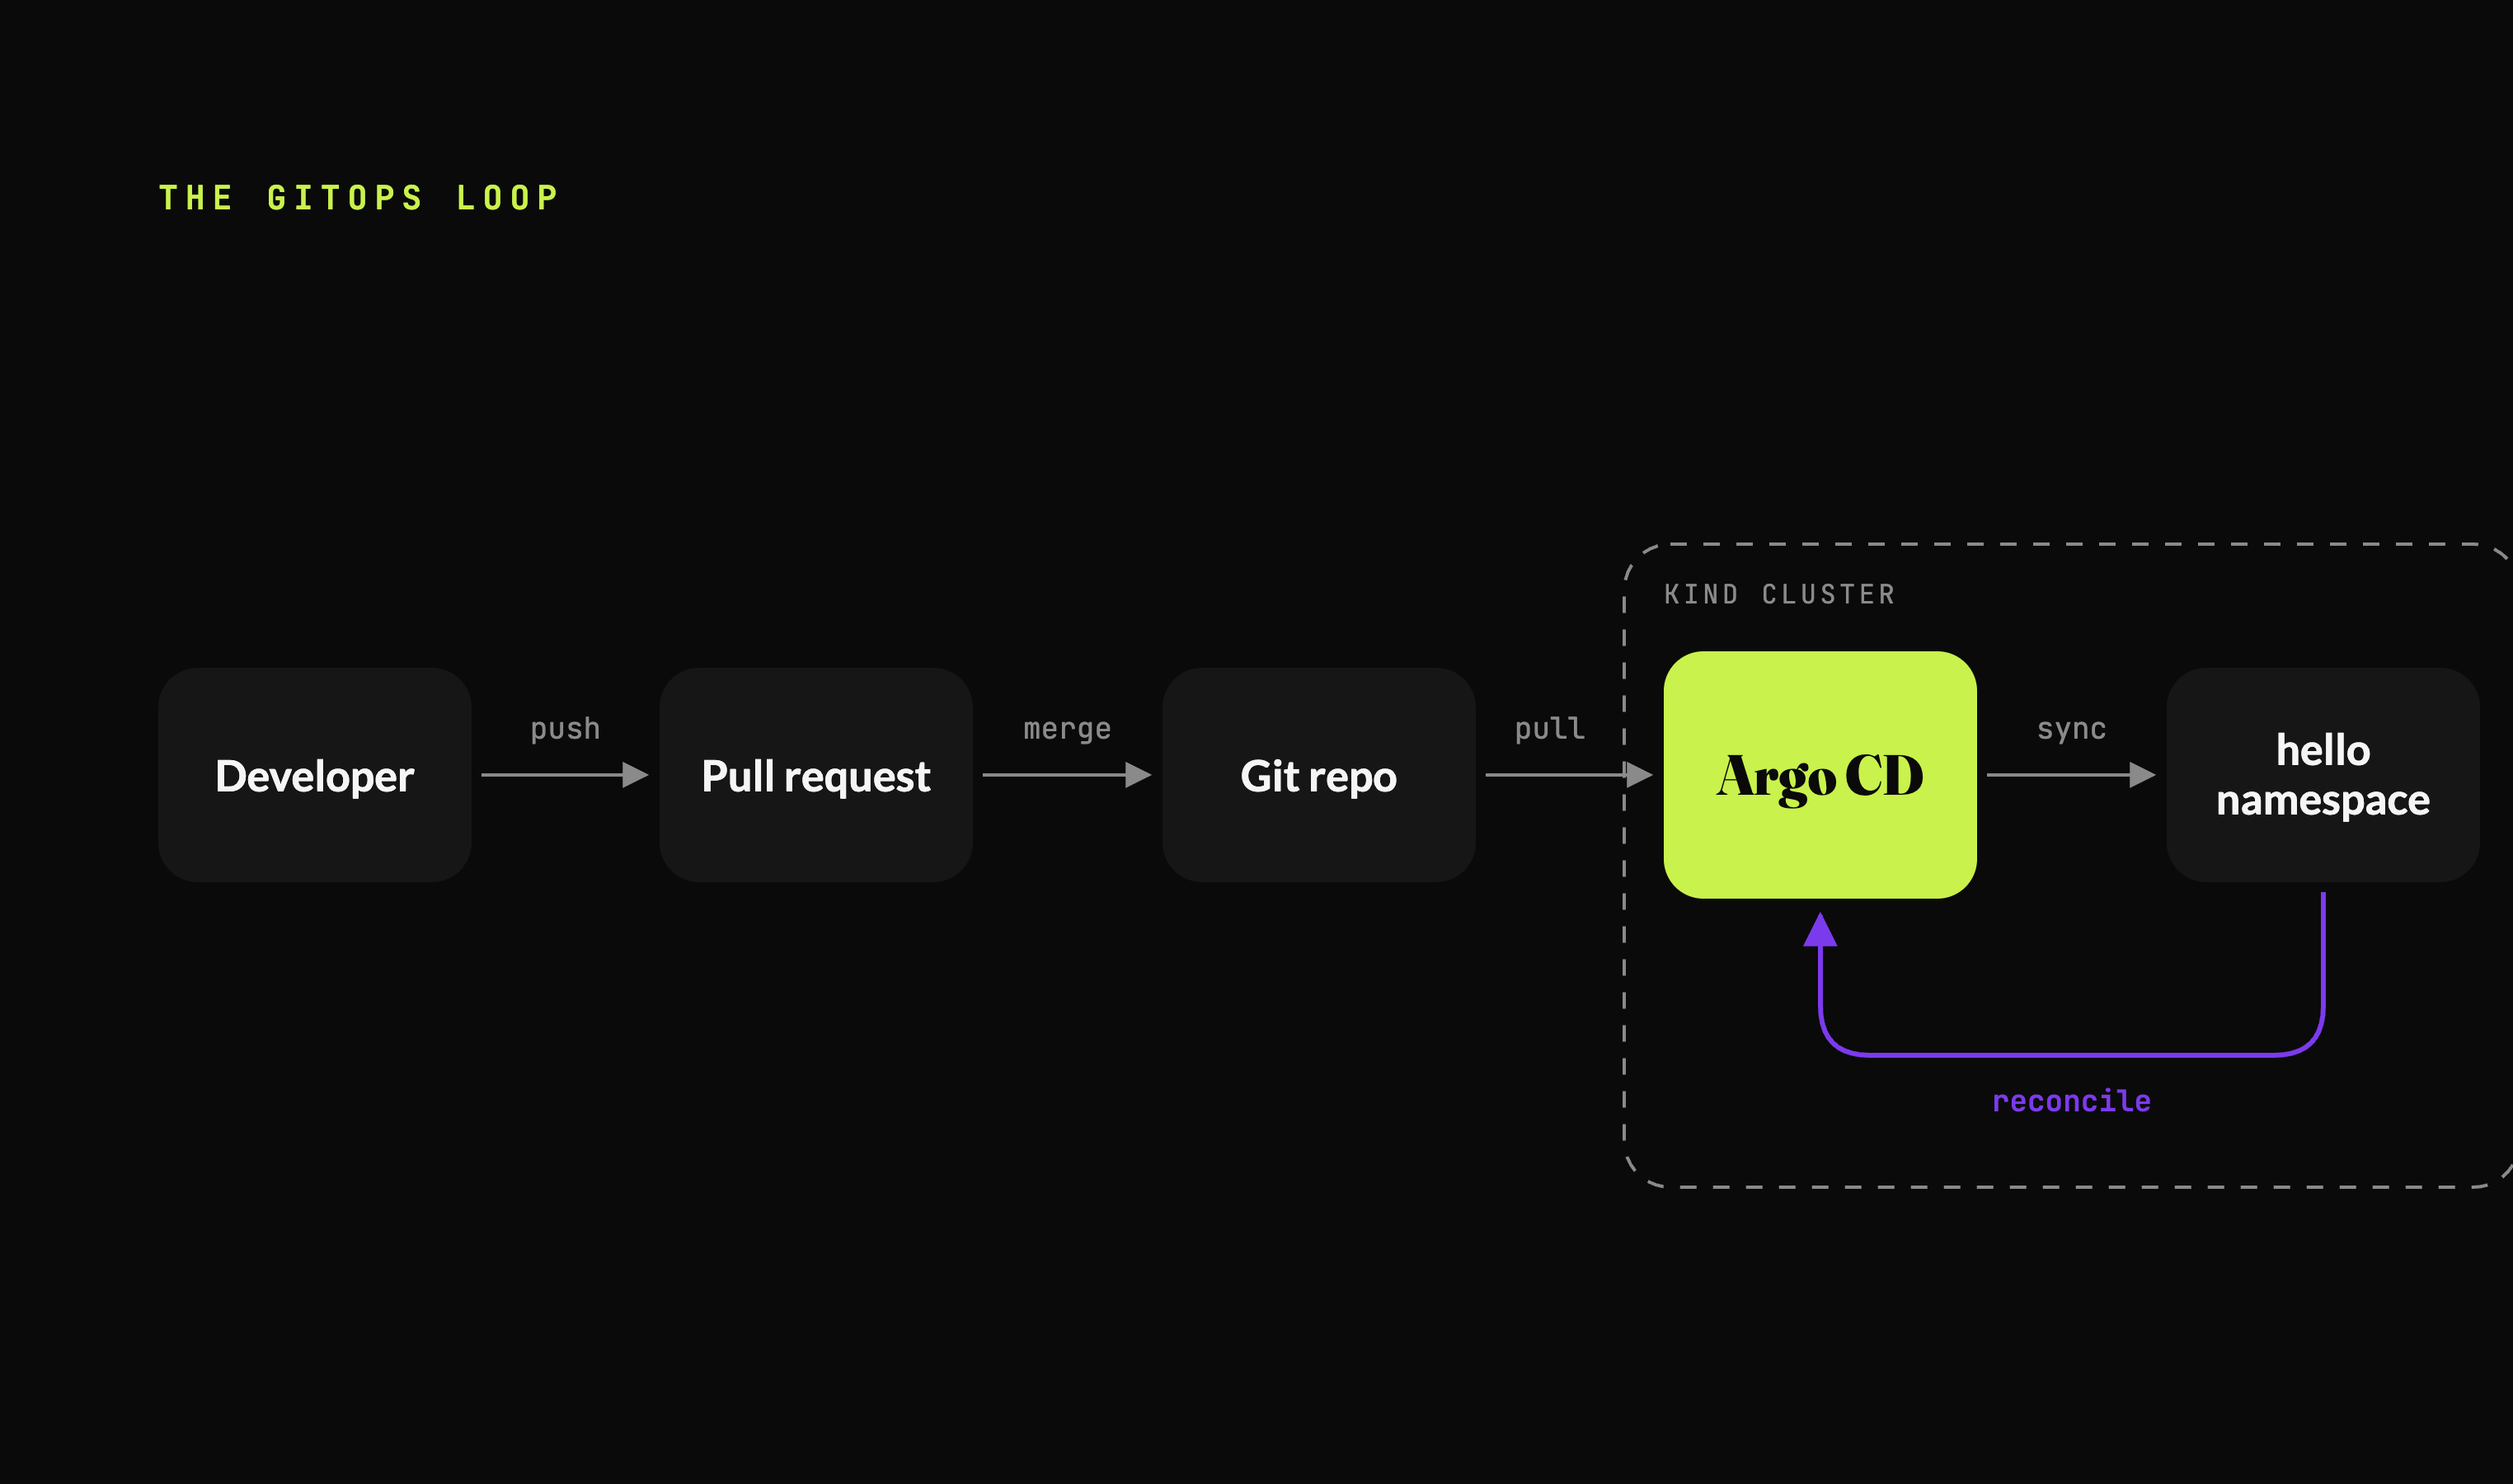
The contract is simple. You change Git, Argo CD changes the cluster. If anyone changes the cluster directly, Argo CD changes it back.
Think of Git as the recipe and Argo CD as a very stubborn chef. You can rewrite the recipe whenever you like. But if someone sneaks into the kitchen and adds extra salt, the chef quietly remakes the dish exactly as written.
Why Argo CD?
GitOps rests on four principles from the OpenGitOps project: the system is declarative, its state is versioned and immutable in Git, changes are pulled automatically by an agent, and the agent continuously reconciles drift.
Argo CD is a graduated CNCF project that implements all four. It runs inside your cluster, pulls from Git, and shows the difference between Git and the cluster in a clear UI. Flux is the other graduated option and works on the same principles. Everything conceptual in this post applies to both.
The pull model also has a security benefit, which came up in the comments on my GitOps post. With push-based deployment, your CI system needs credentials to your cluster. With pull-based GitOps, the agent lives inside the cluster and only needs read access to Git. No cluster credentials ever leave the cluster.
Prerequisites
You’ll need these installed:
- Docker or another container runtime
- kind for a local cluster (any cluster you can reach works too)
- kubectl
- git and a GitHub account (any Git host works; this post assumes a public GitHub repository)
Create a fresh cluster:
kind create cluster --name gitops-lab
kubectl cluster-info --context kind-gitops-lab
If kubectl cluster-info prints a control plane address, you’re ready. Everything below was written against a current Argo CD 3.x release from its stable manifests.
Step 1: Create the Git repository
This repository is the single source of truth for what runs in your cluster. Create a new public repository on GitHub called gitops-lab, clone it, and add an apps/hello folder:
git clone https://github.com/<your-user>/gitops-lab.git
cd gitops-lab
mkdir -p apps/hello
Add the Deployment at apps/hello/deployment.yaml:
apiVersion: apps/v1
kind: Deployment
metadata:
  name: hello
spec:
  replicas: 2
  selector:
    matchLabels:
      app: hello
  template:
    metadata:
      labels:
        app: hello
    spec:
      containers:
        - name: web
          image: nginx:1.27-alpine
          ports:
            - containerPort: 80
And the Service at apps/hello/service.yaml:
apiVersion: v1
kind: Service
metadata:
  name: hello
spec:
  selector:
    app: hello
  ports:
    - port: 80
      targetPort: 80
Notice there’s no namespace in either file. Argo CD will decide where these land, which keeps the manifests reusable across environments.
Commit and push:
git add apps/
git commit -m "Add hello app"
git push origin main
To verify, open the repository on GitHub. You should see apps/hello/ with both files.
Step 2: Install Argo CD
Argo CD runs in its own namespace. Install it from the official stable manifests:
kubectl create namespace argocd
kubectl apply -n argocd --server-side --force-conflicts \
  -f https://raw.githubusercontent.com/argoproj/argo-cd/stable/manifests/install.yaml
The
--server-sideflag matters. Some of Argo CD’s CRDs are too large for a regular client-side apply, which fails with an annotation size error.
Wait until every Argo CD component is running:
kubectl wait --for=condition=Available deployment --all -n argocd --timeout=300s
kubectl get pods -n argocd
You should see pods for argocd-server, argocd-repo-server, argocd-application-controller, argocd-redis and a few others, all Running.
What’s actually running
Three components do most of the work:
- repo-server clones your Git repository and renders the manifests (plain YAML, Kustomize or Helm).
- application-controller is the reconciliation loop. It compares what the repo-server rendered with what’s live in the cluster, and acts on the difference.
- argocd-server serves the UI and API. It’s how you look at things, not how things happen.
Step 3: Open the Argo CD UI
Argo CD generates an admin password on install. Read it:
kubectl -n argocd get secret argocd-initial-admin-secret \
  -o jsonpath="{.data.password}" | base64 -d; echo
Then forward the UI to your machine:
kubectl port-forward svc/argocd-server -n argocd 8080:443
Open https://localhost:8080, accept the self-signed certificate warning, and log in as admin with that password. You’ll see an empty applications page. That’s expected, because we haven’t told Argo CD about our repository yet.
On a real cluster, change the admin password, then delete the
argocd-initial-admin-secret. Better still, connect SSO and disable the local admin user.
Step 4: Create the Application
An Application is Argo CD’s custom resource. It answers three questions: where’s the source, where’s the destination, and how should syncing behave?
Create argocd/hello-app.yaml in your repository:
apiVersion: argoproj.io/v1alpha1
kind: Application
metadata:
  name: hello
  namespace: argocd
spec:
  project: default
  source:
    repoURL: https://github.com/<your-user>/gitops-lab.git
    targetRevision: main
    path: apps/hello
  destination:
    server: https://kubernetes.default.svc
    namespace: hello
  syncPolicy:
    automated:
      prune: true
      selfHeal: true
    syncOptions:
      - CreateNamespace=true
Commit it, then apply it once by hand. This is the only kubectl apply you’ll run for this app:
git add argocd/ && git commit -m "Add Argo CD application" && git push
kubectl apply -f argocd/hello-app.yaml
What’s actually happening here
source points at your repo, the main branch and the apps/hello folder. Argo CD treats everything in that folder as the desired state.
destination says where to deploy. https://kubernetes.default.svc means “the cluster Argo CD itself is running in”, and namespace: hello is where the resources land.
automated turns on automatic sync. Without it, Argo CD would only show you that the cluster is out of date and wait for you to click Sync.
selfHeal: true tells Argo CD to revert manual changes made directly in the cluster. prune: true tells it to delete resources that no longer exist in Git. Both are off by default, and both are what make this real GitOps rather than “deploy from Git once”.
CreateNamespace=true lets Argo CD create the hello namespace if it doesn’t exist.
To verify, check the Application’s status:
kubectl get applications -n argocd
# NAME    SYNC STATUS   HEALTH STATUS
# hello   Synced        Healthy

kubectl get deployment,service -n hello
In the UI, the hello app shows a tree of the Service, Deployment, ReplicaSet and two Pods, all green.
Step 5: Deploy a change the GitOps way
Now change the app without touching the cluster. Edit apps/hello/deployment.yaml and bump the replicas:
spec:
  replicas: 3
Commit and push:
git commit -am "Scale hello to 3 replicas"
git push
Argo CD polls Git every three minutes by default. To skip the wait, click Refresh on the app in the UI, or ask for a refresh from the command line:
kubectl -n argocd annotate application hello \
  argocd.argoproj.io/refresh=normal --overwrite
Then watch:
kubectl get deployment hello -n hello -w
You should see the Deployment go to 3/3. Nothing outside the cluster had credentials to it. The cluster pulled the change.
In production, you’d configure a webhook from GitHub to Argo CD so changes are picked up in seconds instead of waiting for the next poll.
Step 6: Break it on purpose
This is where GitOps clicks. Try to change the cluster behind Git’s back.
Scale the Deployment by hand.
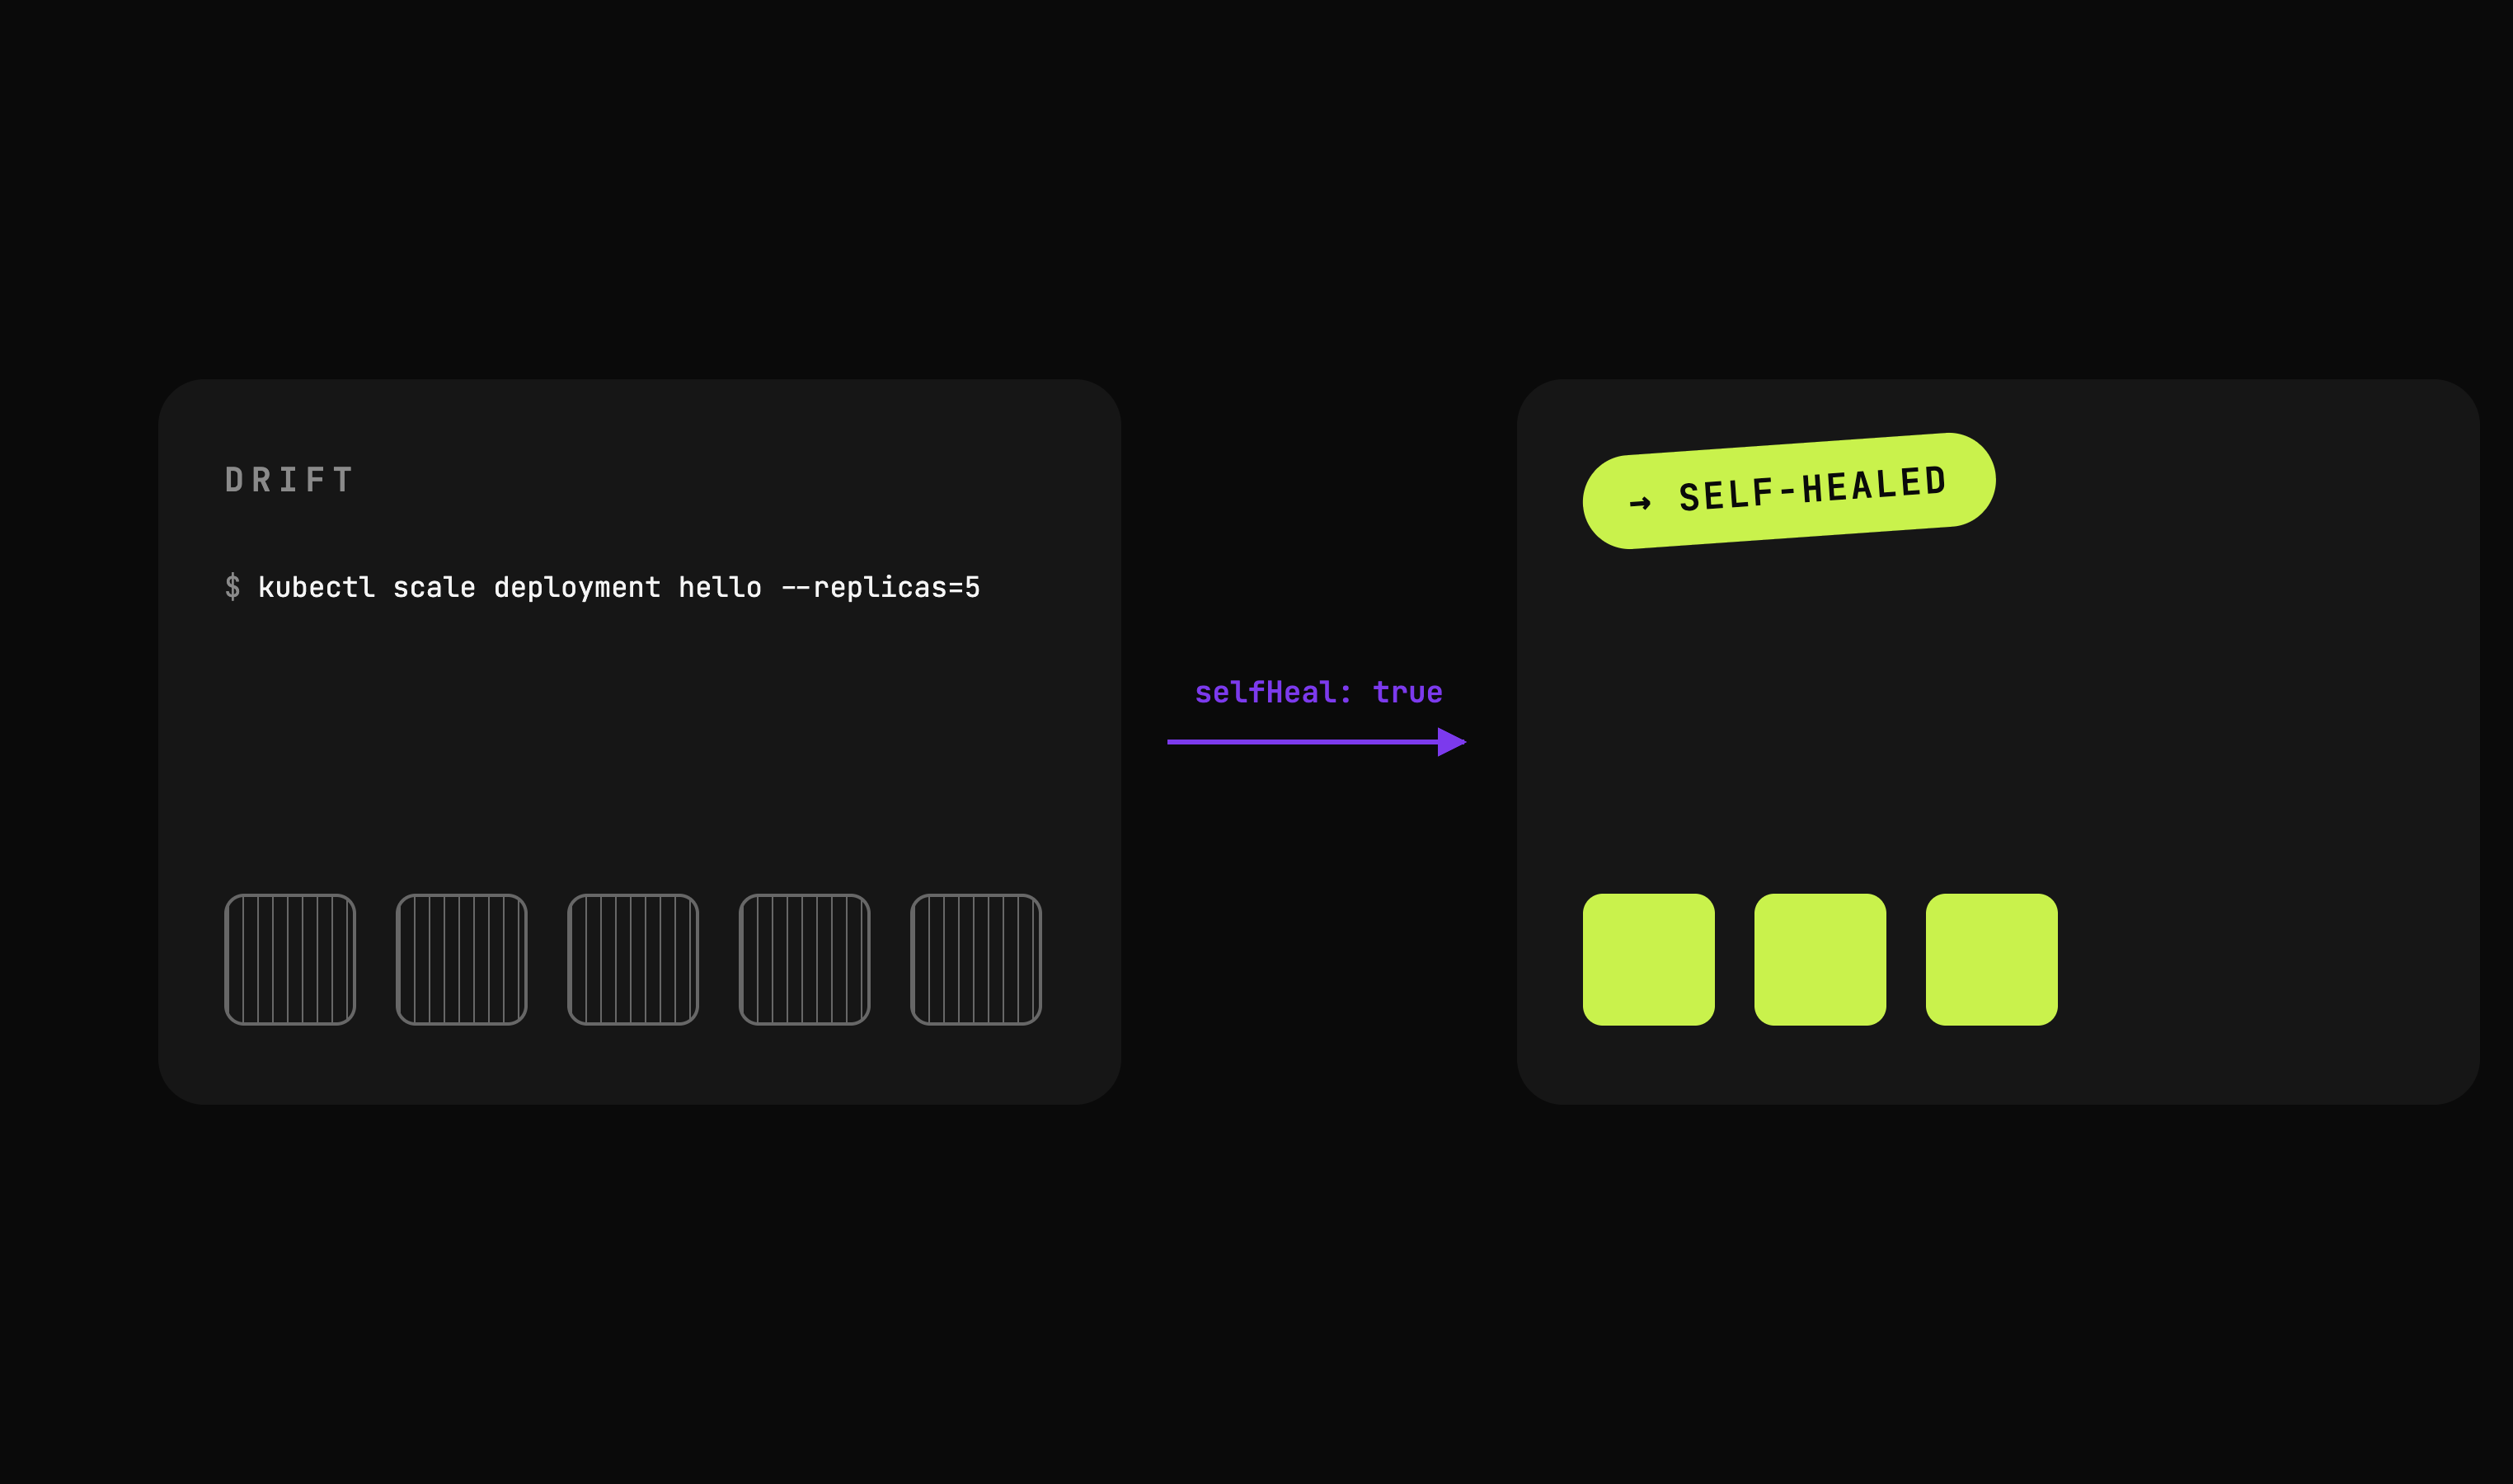
kubectl scale deployment hello -n hello --replicas=5
kubectl get deployment hello -n hello -w
Within a few seconds it’s back to 3. The application-controller saw the live state drift from Git and, because selfHeal is on, reverted it.
Delete the Deployment entirely.
kubectl delete deployment hello -n hello
kubectl get deployment hello -n hello
It comes straight back.
Edit the image in place.
kubectl set image deployment/hello web=nginx:1.25-alpine -n hello
kubectl get deployment hello -n hello -o jsonpath='{.spec.template.spec.containers[0].image}'; echo
Run the second command again after a few seconds and you’ll see nginx:1.27-alpine again. Git is the source of truth, and nothing else is.
Sound familiar? It’s exactly what the Website Operator did in the Kubebuilder guide. The only difference is that Argo CD’s desired state lives in Git instead of a custom resource.
Step 7: Roll back with git revert
Say the 3-replica change turned out to be a mistake. In GitOps, you don’t roll back the cluster. You roll back Git:
git revert --no-edit HEAD
git push
Refresh the app (or wait for the next poll), and the Deployment returns to 2 replicas.
Two things are worth noticing. First, the rollback is a commit, so it’s reviewed, versioned and visible in history like any other change. Second, Argo CD’s own History and Rollback panel in the UI lists every synced revision. With automated sync on, prefer git revert over the UI rollback, because Git must stay the source of truth. A UI rollback with auto-sync enabled will simply be overwritten by the next sync.
Step 8: Prune what you delete
Because prune: true is set, removing a manifest from Git removes the resource from the cluster. Delete the Service:
git rm apps/hello/service.yaml
git commit -m "Remove hello service"
git push
After a refresh:
kubectl get service -n hello
# No resources found in hello namespace.
Without prune, Argo CD would mark the Service as out of sync and leave it running. That’s safer when you’re starting out, but it means your cluster slowly collects resources nobody owns. Add the file back with git revert --no-edit HEAD && git push before moving on.
When you’re done, clean up:
kind delete cluster --name gitops-lab
Common first-GitOps mistakes
A few things catch almost everyone the first time:
- Committing plain Secrets to Git. Base64 isn’t encryption. Use the External Secrets Operator, Sealed Secrets or SOPS so Git only ever holds references or ciphertext.
- Forgetting
selfHealandprune. Without them, Argo CD deploys from Git but tolerates drift, which quietly brings back the problem GitOps was meant to solve. - Rolling back in the UI with auto-sync on. The next sync puts the newer commit straight back. Roll back in Git.
- Pointing
targetRevisionat a branch everyone pushes to. Protect the branch, require reviews, and treat merge rights to it like production access, because they are. - Mixing manual
kubectl applywith GitOps. If some resources are applied by hand and some by Argo CD, nobody knows which is the truth. Pick one, and make it Git.
Where to go next
You now have the core of GitOps working. Real setups build on the same loop with a few more pieces:
- App of Apps lets one Application manage other Applications, so even your Argo CD config lives in Git.
- ApplicationSets generate Applications from a template, for example one per cluster or one per folder.
- Helm and Kustomize sources let the same Application deploy a Helm chart or environment overlays instead of plain YAML.
- Multiple clusters can be registered with a single Argo CD, each as its own destination.
- Argo CD Image Updater or a CI step that commits new image tags closes the loop from build to deploy.
The Argo CD documentation is the best next stop, and the OpenGitOps principles are worth a read to see the ideas behind it.
This post is part of the CeyTech series breaking down CNCF technologies, one at a time – deep tech, no fluff. If you build this, tell me what you’d put under GitOps first in your own cluster.
Comments (...)
You must be signed in to join the discussion.