Master the relationship between images and containers, and understand what’s really happening under the hood
Welcome to week three of our Docker series! You’ve installed Docker and run your first containers. Now it’s time to understand what’s actually happening when you execute those commands. This is where Docker starts to click for most people.
Today, we’re demystifying the two most fundamental concepts in Docker—images and containers—and how they work together.
The Image-Container Relationship: A Clear Mental Model
Let’s start with the simplest explanation that clarifies everything:
An image is a blueprint. A container is a running instance of that blueprint.
Think of it like this:
- Image = Class (in programming terms)
- Container = Object/Instance (of that class)
- Image = Recipe for chocolate cake
- Container = The actual cake you bake from that recipe
What Is a Docker Image, Really?
- Application code — Your program files
- Runtime environment — Node.js, Python, Java, etc.
- System libraries — dependencies your code needs
- Environment variables — Configuration settings
- Commands — What to run when the container starts
- Immutable — Once created, they never change
- Portable — Works the same on any Docker host
- Layered—Built in stackable layers (more on this soon)
- Shareable — Can be distributed via registries
What Is a Docker Container, Really?
- Ephemeral – Designed to be disposable
- Isolated – Have their own filesystem, network, processes
- Lightweight – Share the host OS kernel
- Stateful – Changes are stored in the writable layer
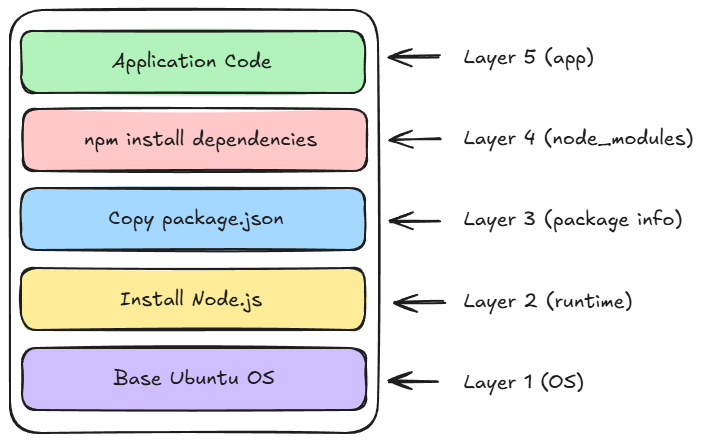
The Magic of Layers: How Docker Images Work
# Pull an image and watch the layers download
docker pull nginx
# You'll see output like:
# latest: Pulling from library/nginx
# a2abf6c4d29d: Pull complete ← Layer 1
# a9edb18cadd1: Pull complete ← Layer 2
# 589b7251471a: Pull complete ← Layer 3
# …
Each line represents a layer being downloaded.
Inspecting Images: Looking Under the Hood
Let’s explore an image in detail:
# Pull an image
docker pull alpine

# View detailed information
docker image inspect alpine
This shows you everything about the image: layers, environment variables, exposed ports, entry points, and more.
For a more readable view of layers:
docker history alpine
You’ll see something like the following:
IMAGE          CREATED       CREATED BY                                      SIZE
c1aabb73d233   2 weeks ago   /bin/sh -c #(nop)  CMD ["/bin/sh"]              0B
<missing>      2 weeks ago   /bin/sh -c #(nop) ADD file:abc123... in /       7.05MB
Each row is a layer, showing what command created it and its size.
The Container Lifecycle: From Creation to Deletion
Containers move through several states during their lifetime:
Created → Running → Paused → Stopped → Removed
Let’s explore each state with commands:
Creating a Container
# Create a container without starting it
docker create --name my-nginx nginx

# Check its status
docker ps -a
# STATUS: Created
Running a Container
# Start the container
docker start my-nginx

# Or create and start in one command
docker run --name my-nginx2 nginx

# Check status
docker ps
# STATUS: Up
Pausing a Container
# Pause a running container (freezes all processes)
docker pause my-nginx

# Unpause it
docker unpause my-nginx
Stopping a Container
# Gracefully stop (sends SIGTERM, waits, then SIGKILL)
docker stop my-nginx

# Force stop immediately
docker kill my-nginx
Removing a Container
# Remove a stopped container
docker rm my-nginx

# Force remove a running container
docker rm -f my-nginx
Hands-On Exercise: Understanding Image Layers
Let’s see layer efficiency in action:
Step 1: Pull two related images
docker pull ubuntu:20.04
docker pull ubuntu:22.04
Watch how some layers are shared! You’ll see “Already exists” for common layers.
Step 2: Check the disk space used
docker system df
Notice that the total space used is less than the sum of both images. That’s layer sharing at work!
Step 3: Examine the layers
docker history ubuntu:20.04
docker history ubuntu:22.04
Compare the layers — you’ll see similarities and differences.
Hands-On Exercise: Container Modifications
Let’s understand the writable layer:
Step 1: Run an Ubuntu container interactively
docker run -it --name test-container ubuntu bash
Step 2: Make changes inside the container
# Create a file
echo "Hello from container" > /hello.txt

# Install something
apt-get update
apt-get install -y curl

# Exit
exit
Step 3: Check the changes
# See what changed in the container
docker diff test-container
You’ll see:
- A = Added files
- C = Changed files
- D = Deleted files
Step 4: Start the container again
docker start test-container
docker exec -it test-container bash
# Your file is still there!
cat /hello.txt
exit
Step 5: Create a new container from the same image
docker run -it --name test-container2 ubuntu bash
# Try to read the file
cat /hello.txt
# It doesn't exist! Each container has its own writable layer
exit
Cleanup:
docker rm -f test-container test-container2
Finding Images: Docker Hub and Beyond
Docker Hub is like GitHub for Docker images — a public registry where you can find images for almost anything.
Searching for Images
Via command line:
docker search python
Via Docker Hub website: Visit hub.docker.com and search for what you need.
Understanding Image Tags
Images have tags to identify different versions:
# Pull specific versions
docker pull python:3.11
docker pull python:3.10
docker pull python:latest  # Usually the newest stable version

# Pull by digest (exact version, immutable)
docker pull nginx@sha256:abc123...
Best practices:
- Avoid latest in production – it changes over time
- Use specific versions — python:3.11.4 instead of python:3.11
- Check official images — Look for the “Official Image” badge
Understanding Official vs Community Images
- Maintained by Docker or the software vendor
- Thoroughly reviewed and tested
- Use simple names like nginx, python, redis
- Recommended for production use
- Created by users like you
- Include username like user/my-image
- Varying quality — check downloads and stars
- Review the Dockerfile before using
Working with Multiple Containers from the Same Image
# Run three nginx containers on different ports
docker run -d -p 8081:80 --name web1 nginx
docker run -d -p 8082:80 --name web2 nginx
docker run -d -p 8083:80 --name web3 nginx

# Check them all
docker ps

# Access them
# http://localhost:8081
# http://localhost:8082
# http://localhost:8083

# Clean up
docker rm -f web1 web2 web3
Each container is completely isolated. They all use the same image (stored once), but have separate writable layers.
Container Names and IDs: What’s the Difference?
Every container has:
- A Container ID (unique, auto-generated): a1b2c3d4e5f6
- A Name (human-readable, optional): my-web-server
You can use either to reference containers:
# Using ID
docker stop a1b2c3d4e5f6

# Using name
docker stop my-web-server

# Docker accepts shortened IDs (first 3+ chars)
docker stop a1b
Pro tip: Always name your containers in production for easier management.
docker run -d --name production-api my-api-image
Understanding Image and Container Storage
Where does Docker store all this data?
Linux: /var/lib/docker/ Windows: C:\ProgramData\DockerDesktop macOS: Inside the Docker Desktop VM
You generally don’t need to access these directly — use Docker commands instead.
Check storage usage:
# See space used by images, containers, volumes
docker system df

# Detailed view
docker system df -v
Common Confusions Clarified
“If I delete an image, do my containers stop?” No! Containers continue running. The image data is still there; Docker just untagged it. You can’t delete an image while containers from it exist.
“If I stop a container, is my data lost?” No! A stopped container preserves all changes in its writable layer. Data is only lost when you remove the container with docker rm.
“Can I run the same container on multiple ports?” No. One container, one port mapping. But you can run multiple containers from the same image on different ports.
“Why does pulling an image take so long the first time but is fast after?” Docker caches layers. The first pull downloads everything. Subsequent pulls of similar images reuse cached layers.
Quick Reference: Essential Commands
# Images
docker images                    # List images
docker pull <image>              # Download image
docker image inspect <image>     # Detailed image info
docker history <image>           # View image layers
docker rmi <image>               # Remove image

# Containers
docker ps                        # List running containers
docker ps -a                     # List all containers
docker create <image>            # Create container
docker start <container>         # Start container
docker stop <container>          # Stop container
docker restart <container>       # Restart container
docker rm <container>            # Remove container
docker diff <container>          # See container changes
docker exec -it <container> bash # Execute command in container

# System
docker system df                 # Show disk usage
docker system prune              # Clean up unused resources
Resources for Deeper Learning
- Docker Hub — Explore available images
- Docker Documentation — Images
- Docker Documentation — Containers
Comments (...)
You must be signed in to join the discussion.