From zero to running containers in 15 minutes
Welcome back to our Docker series! Last week, we explored what Docker is and why it matters. Today, we’re rolling up our sleeves and getting Docker running on your machine. By the end of this post, you’ll have Docker installed and will have launched your first containers.
No theory overload today — just practical, step-by-step instructions that work.
Before We Begin: What You’ll Need
- A computer running Windows 10/11, macOS, or Linux
- Administrator/sudo access
- About 4GB of free disk space
- An internet connection
- 15–30 minutes of your time
That’s it. Let’s go!
Installing Docker: Choose Your Platform
Windows 10/11 Installation
Step 1: Download Docker Desktop for Windows from docker.com/products/docker-desktop
Step 2: Run the installer (Docker Desktop Installer.exe)
Step 3: During installation, ensure “Use WSL 2 instead of Hyper-V” is selected (WSL 2 is faster and more efficient)
Step 4: Restart your computer when prompted
Step 5: Launch Docker Desktop from the Start menu
Important note for Windows users: Docker Desktop requires Windows 10 64-bit Pro, Enterprise, or Education (Build 19041 or higher) OR Windows 11. If you’re on Windows Home, you’ll need to enable WSL 2 first.
macOS Installation
Step 1: Download Docker Desktop for Mac from docker.com/products/docker-desktop
- Choose the version matching your chip (Intel or Apple Silicon)
Step 2: Open the downloaded .dmg file
Step 3: Drag the Docker icon to your Applications folder
Step 4: Launch Docker from Applications
Step 5: Grant the necessary permissions when prompted
Linux Installation (Ubuntu/Debian)
Open your terminal and run these commands:

For other Linux distributions, check the official Docker documentation.
Verifying Your Installation
Once Docker is installed, let’s verify everything works. Open your terminal (Command Prompt, PowerShell, or Terminal) and run:
docker -versionYou should see something like:
Docker version 24.0.6, build ed223bc
Now let’s run the classic verification test:
docker run hello-world
If everything is working correctly, you’ll see a message that starts with “Hello from Docker!” This simple command just:
1. Checked if the hello-world image exists locally
2. Downloaded it from Docker Hub (Docker’s public registry)
3. Created a container from that image
4. Ran the container, which printed the message
5. Exited the container
Congratulations! You’ve just run your first Docker container.
Essential Docker Commands: Your New Toolkit
Let’s explore the fundamental commands you’ll use daily. I’ll explain each one with examples.
1. Checking Docker Info
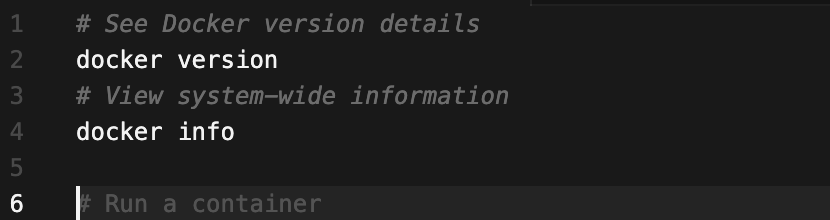
2. Working with Images
Images are the blueprints for containers. Think of them as templates.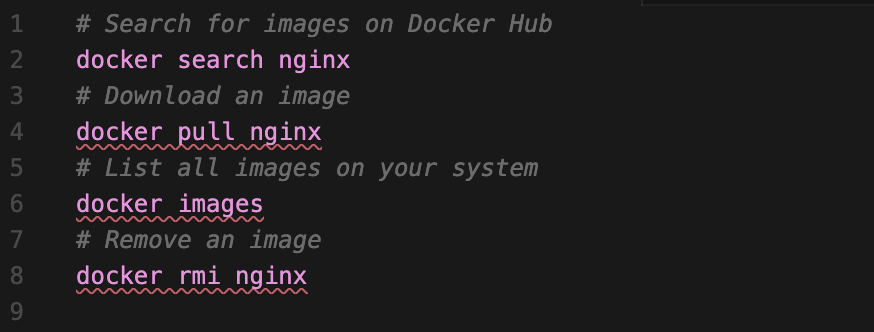
3. Working with Containers
Containers are running instances of images.
4. Viewing Container Output

Hands-On Exercise: Running a Real Web Server
Let’s do something practical. We’ll run an Nginx web server and access it from your browser.
Step 1: Run Nginx with port mapping
docker run -d -p 8080:80 -name my-webserver nginx
Let’s break down this command:
- docker run -creates and starts a container
- -d -runs in detached mode (background)
- -p 8080:80 -maps port 8080 on your machine to port 80 in the container
- -name my-webserver — gives the container a friendly name
- nginx — the image to use
You should see the “Welcome to nginx!” page. You’re now running a production-grade web server!
docker logs my-webserver
You’ll see the access logs showing your browser request.
Step 4: Stop and remove the container when you’re done
docker stop my-webserver
docker rm my-webserver
Hands-On Exercise 2: Interactive Containers
Let’s run a container interactively, which is incredibly useful for testing and debugging.
# Run Ubuntu interactively
docker run -it ubuntu bash
The -it flags mean:
- -i -interactive (keep STDIN open)
- -t -allocate a pseudo-TTY (terminal)
You’re now inside an Ubuntu container! Try some commands: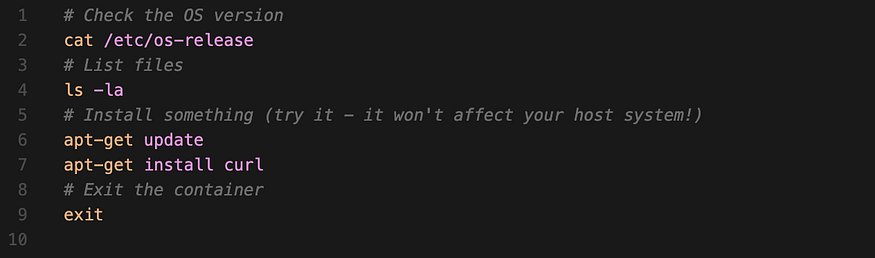
Once you exit, the container stops. This is perfect for experimenting without affecting your actual system.
Understanding What Just Happened
When you ran these commands, Docker did several things behind the scenes:
All of this happened in seconds, with minimal system overhead.
Common Beginner Mistakes (and How to Fix Them)
docker run -d -p 8081:80 nginxProblem: “Permission denied” on Linux
Solution: Either run with sudo or add your user to the docker group (preferred):
sudo usermod -aG docker $USER
# Then log out and back in
Problem: Containers keep accumulating
Solution: Clean up stopped containers regularly:
docker container prune
Problem: Running out of disk space
Solution: Remove unused images, containers, and volumes:
docker system prune
Quick Reference Cheat Sheet
Here are the commands you’ll use most often: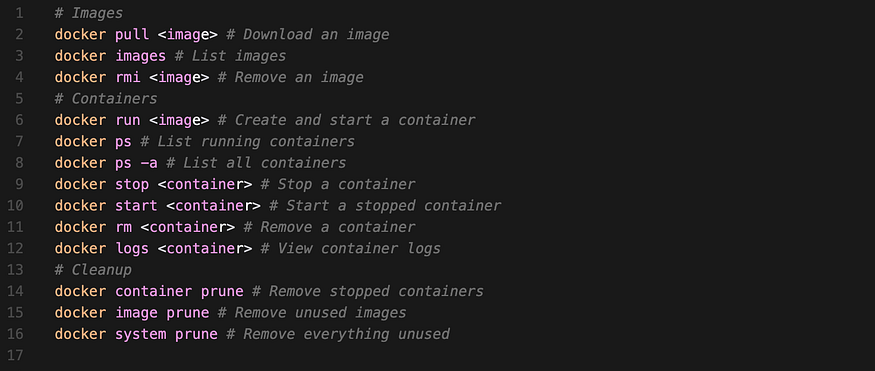
Practice Challenge
Before next week’s post, try this challenge to reinforce your learning:
Run a Redis container in the background (image name: redis)
Check that it’s running with docker ps
View its logs
Stop and remove the container
Clean up any unused containers and images
Post your results or questions in the comments!
Need Help?
Docker has excellent documentation at docs.docker.com. If you run into issues, the Docker community forums and Stack Overflow are great resources.
How did your installation go? Share your experience in the comments, and let us know what you’d like to explore in upcoming posts!
Docker Images and Containers Explained: Understanding the Foundation EP03
Comments (...)
You must be signed in to join the discussion.